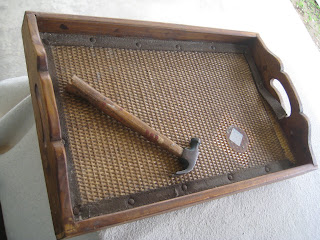
I started out with this tray...... my challenge: make it over using ONLY what I had on hand--no Michael's or Home Depot runs this time! Lately I am finding my remakes are more costly than if I just bought the stinkin' thing...sooo....
(Check out my post about touring the SantaYnez/SantaBarbara wine trail here.)
I also had this idea of a Ballardy-Elegant-Slightly-Shabby look... like these old crates I have been seeing lately. I like them a lot.
Plus I needed some color. My kitchen is pretty monotone right now...
I had this sample paint in my paint cubby..(ok, ok-- the shelf above my washer in the garage)
I ripped out the center of the tray--it was stained and gross grasscloth and had a tile just glued in the middle of it. I bought this thing like 6 years ago at a Model Home Furnishings clearance center for 3 bucks. A lot of those places have trays with stuff glued on them and I don't know what kind of glue they use but man its almost impossible to get it off! Can you believe I've had it just gathering dust all that time?
Here it is, after sanding and wiping off, getting a quick sloppy coat of acid green.....
hmmm..not much better but wait, I have a vision and I know it will look good!
See where I'm going?
Now after the green coat dried, I painted over it, rather sloppily (is that a word?) with white... a flat paint probably would have been better but I used what I had, which was eggshell....
Here's a detail of how it looked. Let this dry completely.
Then I came in with my sandpaper and went to town. I sanded all the edges, exposing some brown wood under all the paint layers. I also sanded the sides slightly to expose only the green layer in places. I thought I was going to add a glaze to further bring out the wood, but found I did not need to... it looked just the way I wanted it to.
Now a few coats of Spray-On Matte Clear.... let this dry overnight. Adds a sheen without being shiny and most importantly, protects the chippy and exposed parts.
Before you get too far,
get your corks ready. I would lay them out first and make sure you have enough. This 13 x 9 tray took about 130 corks!!! You can also buy corks on Ebay.
I used a thick layer of gorilla glue and then lightly pressed the corks into it, alternating their direction here and there. Piece it together like a puzzle. They won't fit perfectly, but thats OK.
Then I weighed it down with a few heavy items and let dry while I took a break. This is hard work, I tell ya, I may need a glass of wine!
Here is my finished version....
I could use a piece of glass or plexi for added stability. I like the idea, though, that cork is a natural "trivet"...so I may just keep it this way.
You can also buy a kit to make a wine cork tray like this:
or look how cute this is:
Above Image from: Trendy Gifts
So, drink some wine and have fun with your wine cork crafts!!
There are pretty patterns you could do too... Kinda wish I would have planned mine better now... but my impromptu style IS charming, don't you think?
See you at Frugalicious Friday at Finding Fabulous and My Romantic Home Show and Tell.. I'll be linking up!


Love this wine cork tray! I'm going to have to start saving some! Great tutorial too -thanks for sharing! ~Marcy
ReplyDeleteGreat Idea! Turned out nice..
ReplyDeleteOh my gosh, that is fantastic! I'm a big wine lover but we're living on one income while I look for a job so it's wine in a box for now:(
ReplyDeleteterrific job.
ReplyDeleteThat's awesome! It looks greAT!
ReplyDeleteThanks for this tutorial! I know my sister was looking for something to do with her corks so I'll send this to her!
ReplyDeleteTOTALLY CUTE!! Thanks for linking up to my first party and I hope to see you back at my place next week!!
ReplyDeleteJessica
Thanks for stopping by my blog. Your tray is great! That hadn't occurred to me when I did this: http://robertapm28.blogspot.com/2009/01/crafts-wine-cork-bulletin-board.html
ReplyDeletebut it's a fabulous use of the corks too!
I invite you to become a follower...
That cork chair is amazing.
wow, I like your tray. Ha, best recycling ever - with all the vino that has to be consumed in order to get all the corks... ;-)
ReplyDeleteGreat looking tray. So creative!
ReplyDeleteI'd love for you to come by and link up this week for Friday Favorites!
I love the pictures and things you've posted here, and I would like to follow your blog but I don't see a "follow" section in the sidebar...maybe it's something wrong with me? lol
ReplyDeleteI love this tray! Another thing to put on my To Do list!!! Love it!
ReplyDeleteWow, that is so adorable!
ReplyDeleteI just saw someone giving away a whole bag of corks on Freecycle, too....
This is great!! I've just recently told my husband we need to start saving our corks because I've wanted to do the same thing. :) I can't wait, thanks for the post.
ReplyDeleteAutumn
TheFickleHobbyist.com