I have been looking forever for a mirror for my fireplace. I really wanted one of these quartrefoil mirrors
but my HomeGoods and Lowes never have it. I've seen one like it around Blogland found at Target too, but alas, they must have been all gone. It's OK too because I am in super-cheap Dave Ramsey mode and don't want to spent a dime on anything I don't have to right now.
Enter: Big Lots... I know I promised these would be zero-dollar projects, but $7.00 is close enough to zero, right? Oh, Why was I inside a Big Lots, you ask? When I VOWED to myself and my readers I'd only be tackling next-to and free projects? Well, everyone knows they have the best deals around on kitty litter, right?
OK, started here:
$7.00 on clearance "Made in Italy" (!!) Mirror from Big Lots, check
$8.00 worth of wood shims from Home Depot, check
Glue I had in the garage for another (unfinished) project, check
I laid out the shims on the mirror in a trial and error way until I found a pattern that worked for me.
This is what I have done so far...stay tuned for the reveal!
Make it a Great Day!
Ann
Showing posts with label zero dollar. Show all posts
Friday, June 17, 2011
Wednesday, June 8, 2011
Zero Dollar Decor: Free Balls!
I wanted some of those cute fabric orbs to fill my wire basket....but I am simply too cheap creative to just go out and buy some.
Sooo, of course I check your ideas in blogland...and found this great project that uses fabric scraps and newspaper, a little twine and maybe some tape!(A kitten helper won't hurt either)
It literally took 5 minutes.
Here's what I did:
Gather some newspaper and crushed it into vague spheres...added tape when I needed it...
I just wrapped the strips of fabric round and round till the balls were covered...some I anchored with twine...
They really look cute gathered altogether in my basket..
Looks great...and Faa-Reeee!!!
Sooo, of course I check your ideas in blogland...and found this great project that uses fabric scraps and newspaper, a little twine and maybe some tape!(A kitten helper won't hurt either)
It literally took 5 minutes.
Here's what I did:
Gather some newspaper and crushed it into vague spheres...added tape when I needed it...
![]() |
| newspaper ball near the front...just wrap it with 1-2 inch thick strips of fabric..the front fabric is actually upholsterer's webbing. I cut it in half lengthwise |
They really look cute gathered altogether in my basket..
Looks great...and Faa-Reeee!!!
Make it a Great Day!
Ann
Thursday, May 26, 2011
Sauce Jar to Saucy Accessory!
I had been saving these salsa, tomato sauce, and pickle jars thinking I would turn them into cute outdoor lanterns with tea candles in them. But I needed wire, and rocks or sand for the bottom, and I didn't want to spend a dime, so....
I had some chalkboard paint from my recent cupboard door to chalkboard project. And I always have twine....
Here's how I did it:
Soaked the labels off overnight in warm soapy water, Then I taped off (freehand was fine) the section I wanted to be chalkboard. (This would be much easier if you use a stick on cb label, but I was going for free so I used what I had) I painted it by hand and it needed 2 coats, drying between each coat.
I wound the tops with twine (I really need to put a spot of glue to secure it)...
Aren't they so cute!
Perfect for kitchen storage
and here, in my remade bathroom!
I am so happy with how they turned out!
Make it a Great Day!
Ann
Hooking up to House of Hepworths
Monday, May 23, 2011
New Old Vanity and Master Bath Mini-Makeover
As you know, I have tried to update my house using very little money. Zero if possible.
Here's where we started:
I sanded verylazily lightly....
Applied the glaze with a brush
Then waited for it to dry and used a satin finish wipe on poly, which I brushed on.
New knobs, and tada!!
I couldn't wait to try on the knobs...the drawers were barely dry!
Looks soooo much better!
Added my new TP holder I got eons ago at Homegoods...6.99(nope not counting the 6.99 cause it was EONS ago--sitting in my drawer)
I still can't believe how ONE coat of the glaze makes such a collossal difference in the wood tone. So easy-- a one-day project, really.
And, yes, I purposefully left off the center door of the vanity. I also want to line the interior with wallpaper, or maybe beadboard. I put that basket in there as a hamper. The bathroom is so skinny, there's no real room for a regular size hamper, so this will work for now.
I also painted the hutch-shelf thingy above the toilet. I toyed with the idea of taking it down, but I need storage desperately, and it was attched by these huge bolts to the wall. I took the doors off and painted it white. I do want to line the sides with that beadboard wallpaper if I ever get around to it.
Here's some more views...
This is by no means the end of this makeover, it really is a Phase 1. Eventually, I want to rip out the shower and replace it with real tile, and a nice frameless glass door. Also up on the list is new floor and some color on the walls, artwork, and a framed(maybe using molding?stick on embossed tin tiles?) mirror. But for now, it works. There's really so much you can update with some imagination and existing materials.
I will post how I made those adorable jars tomorrow (hint: tomato sauce and salsa jars!)...stay tuned!
Make it a Great Day!
Ann
also linking to Primitive and Proper Piece of Work Wednesday...
Here's where we started:
I decided to glaze my orange oaky vanity, with a dark brown glaze(Behr, Espresso). I have had this itty bitty can 2 years now and have used it over and over again...a little goes a long way.
I sanded very
Applied the glaze with a brush
Then waited for it to dry and used a satin finish wipe on poly, which I brushed on.
New knobs, and tada!!
I couldn't wait to try on the knobs...the drawers were barely dry!
| Messy, in progress! |
| From old brass to ORB...Used the existing hinges /screws and spray painted |
Looks soooo much better!
Added my new TP holder I got eons ago at Homegoods...6.99(nope not counting the 6.99 cause it was EONS ago--sitting in my drawer)
I still can't believe how ONE coat of the glaze makes such a collossal difference in the wood tone. So easy-- a one-day project, really.
And, yes, I purposefully left off the center door of the vanity. I also want to line the interior with wallpaper, or maybe beadboard. I put that basket in there as a hamper. The bathroom is so skinny, there's no real room for a regular size hamper, so this will work for now.
I also painted the hutch-shelf thingy above the toilet. I toyed with the idea of taking it down, but I need storage desperately, and it was attched by these huge bolts to the wall. I took the doors off and painted it white. I do want to line the sides with that beadboard wallpaper if I ever get around to it.
| before |
| After |
| After |
Here's some more views...
And one more Before
And After
| Dunno why my pics are so fuzzy....but you get the idea! |
I will post how I made those adorable jars tomorrow (hint: tomato sauce and salsa jars!)...stay tuned!
Make it a Great Day!
Ann
also linking to Primitive and Proper Piece of Work Wednesday...
Wednesday, April 13, 2011
Mod Podge Japan Table
Recently, just before the devastating Earthquake in Japan, my daughter and I discovered Marukai Japanese Market here in L.A--West Covina to be exact. We had a wonderful time (blog post here) and picked up great grocery items and more. We loved all the colorful graphics of the packaging and even the store circular, so I decided to use them on a FREE Zero-Dollar project.
Here is the project:
Project consisted of an Ikea LACK table, lightly sanded. Some scrapbook paper I had, some wrapping paper, and all those packaging and store circulars, cut into pieces. We just cut and pasted on with copious amounts of High-Gloss Mod Podge.
It looks great in her room.
Best part? FREEE!!!!!!!!!!!!!!!!!!!!!!!!!!!!!!!!!!!!Zero-Dollar project.
Make it a Great Day!
Ann
Here is the project:
| ahhh... a full jar of mod podge I already had |
| Material ready: packaging and various paper |
| Cool wrapping paper I had bought awhile ago at Big Lots for $1 a roll |
| begin by painting on mod podge a section at a time |
| Add flat pieces as you go along... |
| Keep going ...... |
| and going.... |
| then add mod podge all over the top |
| detail of top when dried |
Project consisted of an Ikea LACK table, lightly sanded. Some scrapbook paper I had, some wrapping paper, and all those packaging and store circulars, cut into pieces. We just cut and pasted on with copious amounts of High-Gloss Mod Podge.
It looks great in her room.
Best part? FREEE!!!!!!!!!!!!!!!!!!!!!!!!!!!!!!!!!!!!Zero-Dollar project.
Make it a Great Day!
Ann
Sunday, April 10, 2011
Zero Dollar Project: Chalkboards
Oh my! These came out sooo cute! And free!!!!!!!!!!!!!!!!!!!!!
I had these cabinets fronts from my big fat kitchen makeover when we first moved here (long story, here it is if you're interested) Now I wish I'd saved ALL the fronts--they really are pretty all redone up! My daughter and I got to work...
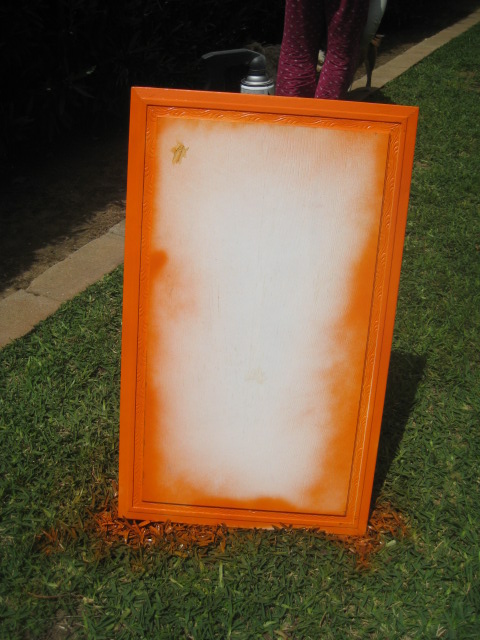
We painted one orange, for my daughter, and one green--well for me, wasn't sure where I'd put it. I've had that chalkboard paint forever, and the spray paint was already in my cupboard.
Here's what we did:
I really like how they turned out. I have a HUGE door that came from the former pantry...I WAS going to use it as a headboard, but if its not the right size I will make another super-size one of these babies and hang it on my patio maybe.
Make it a Great (Zero-Dollar) Day!
Ann
I had these cabinets fronts from my big fat kitchen makeover when we first moved here (long story, here it is if you're interested) Now I wish I'd saved ALL the fronts--they really are pretty all redone up! My daughter and I got to work...
We painted one orange, for my daughter, and one green--well for me, wasn't sure where I'd put it. I've had that chalkboard paint forever, and the spray paint was already in my cupboard.
Here's what we did:
| Cabinet front- filled in hole where handle used to be |
| Spray painted |
| dry and ready to be taped to receive chalkboard paint |
| one coat on, watiting to dry overnight then apply coat 2 |
| Detail in cabinet edge |
| Added some distressing and glaze |
| Added some rub-on Poly to the frame |
| Finito and hanging in the dining room... |
I really like how they turned out. I have a HUGE door that came from the former pantry...I WAS going to use it as a headboard, but if its not the right size I will make another super-size one of these babies and hang it on my patio maybe.
Make it a Great (Zero-Dollar) Day!
Ann
Subscribe to:
Posts (Atom)